In his book Stage lighting in the Boondocks author James Hull Miller puts forth a solution for just such situations. With off the shelf parts he explains how to build a small custom dimmer board as well as easily constructed lighting booms and PAR lights. With this equipment in hand he has helped produce hundreds of shows in less than ideal environments all over the United States.
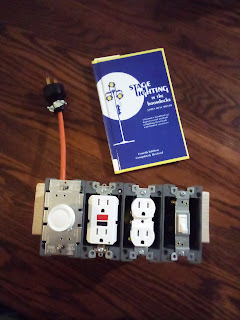
With the advent of dimmable LED floodlights, a simple household dimmer switch can now be used to run lights for a show. The sample light board pictured above can be built for around $30 and allows for one dimmable circuit and one standard circuit. Miller recommends the cool light be used on the standard circuit and the warm lights on the dimmable circuit. This simplifies cues throughout the show.
To make this dimmer board you will need:
1 dimmer switch
1 light switch
2 power outlets
14 or 16 gauge coated wire
1 male replacement power cord end
1 4 gang electrical box
wire nuts
Here is a video of the Frugal Filmmaker building a similar dimmer for 2 prong lights. Ours will be significantly heftier so it can handle more than 1 light at a time.
Here is the wiring diagram from the book:

No comments:
Post a Comment