Tuesday, December 28, 2021

2x4ft Mobile Platforms

As I began looking at options for a portable stage I discovered these miniature platforms that are easy to build and move. They cost about $20 to build and can be assembled in under an hour.

Parts list
2 2x4s
1 sheet particle board 2x4 feet

Cut list
2 2x4s at 4 feet
4 2x4s at 21 inches

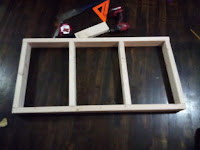
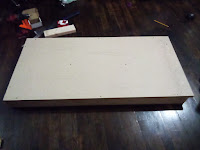
Pre-drill holes in the 4 foot 2x4s at 1 inch and 16 inches from each end. secure the 21 inch 2x4s at these points with 2.5 inch screws. Lay the particle board on top and drive 1.25 inch screws along one edge, then square up the opposite side and finish securing the particle board.

 Once assembly is complete, throw on a coat or two of black paint and your platform is good to go! 

One thing I really like about this platform design (aside from being inexpensive to build) is that you can stack them to make a multi-level set or stairs without worrying about your underlying supports. They work great as a portable stage or as part of a set of platforms on a normal sized stage.

Medieval Hair Dressing

One of the best ways to sell your costume is through a period hat or hair dressing. 

For women, here is a quick tutorial for a simple veil:


Or for a veil and wimple, here is another video:


For men I recommend a coif or hood:

Printable Coif Pattern: (PDF)

Coif tutorial:


Hood tutorial:


Medieval Clothing Crash Course

I was browsing the web for some simple costumes for a Shakespeare production and stumbled on this video that is essentially a crash course in medieval costumes on a budget. I recommend everything this guy says, so take a look and start assembling your costume today!


Wednesday, December 22, 2021

Stone Wall Backdrop

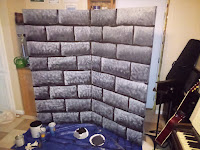
Arguably one of the most useful backdrops when performing Shakspeare is a stone wall. In this article we will go over the process of preparing a flat and painting stone.

There are two main types of flats, Broadway or canvas, and Hollywood or wood. Canvas are the most common in schools because they cost less to build and are light weight and easy to store. Wood flats are used in television and at the college level because they are sturdy, easy to configure, and if built properly can last for decades.

Here are some videos showing how to make each type of flat.

Broadway:


Hollywood:

For our stone wall project I had some old flats that needed new canvas, so that is what we will run with.

I started by removing the old muslin from the flats, then stapled the new muslin into place. Next I needed to prime the flat. Knowing that I would be painting a stone wall, I decided to prime the flats with black paint instead of the usual white. This allowed me to save time later by not needing to shade in the grout lines.

After getting the flat primed, I experimented with a few rows to get my technique where I wanted it. The method I used was pinching masking tape onto the flat for the grout lines, then painting in the stones.

Here is a short video demonstrating the technique for pinching the tape. I found the spackle unnecessary.


Sunday, December 19, 2021

The Best No Sew Bow Tie

 My oldest son has an affinity for bow ties, so we decided to make him a bow tie in his favorite color. We looked through dozens of patterns online and stumbled across this amazingly simple pattern that you can make in less than an hour once you have everything gathered.

I can't take credit for this one, but I will definitely pass this along to anyone who needs a quick and simple bow tie!


Friday, December 17, 2021

Light Positions

So you have your stage set and you are ready to add some lights. But to your dismay there is no way to mount lights on the ceiling, even if you had a professional light kit. So what do you do?

Knowing that the above scenario is all too common, you do still have options for lighting your show. Let's add in the additional issue of budget and say that all you have available are some clamp lights from the local hardware store and a handful of LED or CFL bulbs. What can we do to light our show?

The 45 Degree Rule

The ideal scenario is to have your lights at a 45 degree angle to either side of the stage, or 45 degrees above your stage. While we won't be able to achieve this completely, we will keep this rule in mind and do our best to make it happen.

Wash vs Area

With the equipment at our disposal, we will want to focus on doing an all over wash of the stage, rather than trying to light specific areas. As our budget allows, adding more or better lights to our kit will allow us to then focus on specific areas down the road.

Foot Lights

With the above two ideas in mind we can now examine our first option, which is the tried and true Foot Light set up. This type of lighting can still be seen in period movies today. In its original form, candles or lanterns were placed along the front of the stage with reflectors guiding the light up toward the actors. With our clamp lights we can make small stands to clamp them to, or just lay them right on the floor if we are really in a pinch.

Even in this low position we can still try to follow the 45 Degree Rule by pointing our lights at each part of the stage at 45 degrees. The result is an even wash, that will highlight the face well, but may cast lots of shadows on our backdrop.

Low Beam

One step above the Foot Light is the Low Beam. Our ideal scenario would be a beam mounted to the ceiling, however, in our current situation a beam standing on the floor can be just as effective. We can accomplish a 45 degree up angle from the low beam, however we will still have those troublesome shadows mentioned with the Foot Lights.

Truss or T-stand

This option can get our lights somewhat up in the air, on a vertical truss or t-stand. We may not get our 45 degree up angle, but we can certainly get 45 degrees out from the stage in either direction. Be careful of sight lines though! You don't want to block any audience member from seeing the show because the truss was placed in just the wrong spot.

Corner Lighting

Similar to Truss or T-stand, Corner lights are placed along the corners of the stage on whatever you have available. You may have one light on the ground while the others are clamped to a book case or pole just off stage behind the grand curtain. This is a little more seclusive than the Truss by itself, and it gives you the option to point lights at the backdrop to lose some of those shadows made by other lights.

A Combination

While each of these options have their pros and cons, you can combine methods to get a pretty reasonable set up for your show. For example, using Foot Lights and Corner Lights could eliminate the shadows on the backdrop while still illuminating the actors faces well along the front of the stage.

Monday, December 6, 2021

Free Scripts

If you are looking for some free/short scripts to get started, here are some resources to check out. Come back often as I am constantly on the look out for free scripts:


Compact Shakespeare

Project Gutenberg Plays