Wednesday, January 5, 2022

Micro Dimmer Board


Once you have a stage or acting area of some kind, the next thing you need to worry about is how to light it properly. In "ye olden tymes" dimmers and light boards were expensive and well beyond the reach of small production companies. Even now many schools are stuck with outdated track lighting that can only be used for basic washes of light on the entire stage. Lighting a specific acting area is out of the question.

In his book Stage lighting in the Boondocks author James Hull Miller puts forth a solution for just such situations. With off the shelf parts he explains how to build a small custom dimmer board as well as easily constructed lighting booms and PAR lights. With this equipment in hand he has helped produce hundreds of shows in less than ideal environments all over the United States.

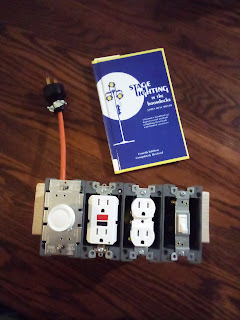
With the advent of dimmable LED floodlights, a simple household dimmer switch can now be used to run lights for a show. The sample light board pictured above can be built for around $30 and allows for one dimmable circuit and one standard circuit. Miller recommends the cool light be used on the standard circuit and the warm lights on the dimmable circuit. This simplifies cues throughout the show.

To make this dimmer board you will need:

1 dimmer switch
1 light switch
2 power outlets
14 or 16 gauge coated wire
1 male replacement power cord end
1 4 gang electrical box
wire nuts

Here is a video of the Frugal Filmmaker building a similar dimmer for 2 prong lights. Ours will be significantly heftier so it can handle more than 1 light at a time.


Here is the wiring diagram from the book:
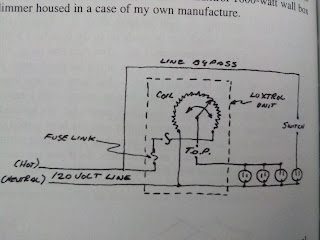

In his case he wired 3 outlets to the dimmer and 1 to the regular switch. I wired 1 set (or 2 outlets) to each, and I used a GFCI plug in lieu of a fuse so if I pull too many amps, I can reset right at the dimmer instead of hunting for the fuse box.

If you have never wired a plug or switch before, here is a short video to get you started:


Once you have your outlets and switches wired, the last step is to wire the plug on the end of your source cable. Just follow the green to ground, black to brass, white to silver rule, and you should be ready to roll!

If you need more than one dimmer box, Miller strongly recommends plugging them into outlets on different breakers so you don't overload the existing wiring. 

Monday, January 3, 2022

Stage Knife


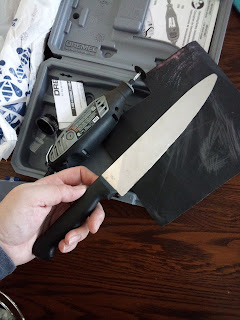
A prop found in many shows, especially fantasy and mystery or suspense shows is a big knife. An easy way to make this prop is with a real knife and a dremel or grinding wheel. 

I found this knife at a second hand store for $2. I looked for one with a nice handle and a deep enough blade that when I cut the sharp edge of the blade off it still looked natural. I also rounded off the tip so it wouldn't hurt anyone on accident. This process essentially reverses the knife back to a blank, so that it is dull on all edges. 

Care should still be taken during the show so that the actors are kept safe. The prop master or weapon master should be on hand to give this knife to the actor as they go on stage, and to receive it from them as they exit. Not to say that actors mess around with props when they shouldn't, but it happens. Just play it safe and make sure it gets back on the prop table asap!

That being said, this is a gorgeous knife! And the glint of light on the steel blade really sells the prop to the audience. 

Tuesday, December 28, 2021

2x4ft Mobile Platforms

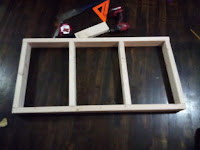
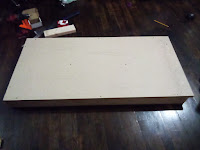
As I began looking at options for a portable stage I discovered these miniature platforms that are easy to build and move. They cost about $20 to build and can be assembled in under an hour.

Parts list
2 2x4s
1 sheet particle board 2x4 feet

Cut list
2 2x4s at 4 feet
4 2x4s at 21 inches

Pre-drill holes in the 4 foot 2x4s at 1 inch and 16 inches from each end. secure the 21 inch 2x4s at these points with 2.5 inch screws. Lay the particle board on top and drive 1.25 inch screws along one edge, then square up the opposite side and finish securing the particle board.

 Once assembly is complete, throw on a coat or two of black paint and your platform is good to go! 

One thing I really like about this platform design (aside from being inexpensive to build) is that you can stack them to make a multi-level set or stairs without worrying about your underlying supports. They work great as a portable stage or as part of a set of platforms on a normal sized stage.

Medieval Hair Dressing

One of the best ways to sell your costume is through a period hat or hair dressing. 

For women, here is a quick tutorial for a simple veil:


Or for a veil and wimple, here is another video:


For men I recommend a coif or hood:

Printable Coif Pattern: (PDF)

Coif tutorial:


Hood tutorial:


Medieval Clothing Crash Course

I was browsing the web for some simple costumes for a Shakespeare production and stumbled on this video that is essentially a crash course in medieval costumes on a budget. I recommend everything this guy says, so take a look and start assembling your costume today!


Wednesday, December 22, 2021

Stone Wall Backdrop

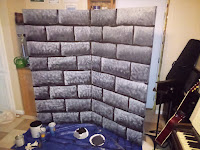
Arguably one of the most useful backdrops when performing Shakspeare is a stone wall. In this article we will go over the process of preparing a flat and painting stone.

There are two main types of flats, Broadway or canvas, and Hollywood or wood. Canvas are the most common in schools because they cost less to build and are light weight and easy to store. Wood flats are used in television and at the college level because they are sturdy, easy to configure, and if built properly can last for decades.

Here are some videos showing how to make each type of flat.

Broadway:


Hollywood:

For our stone wall project I had some old flats that needed new canvas, so that is what we will run with.

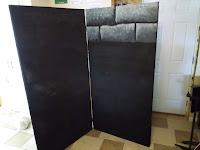
I started by removing the old muslin from the flats, then stapled the new muslin into place. Next I needed to prime the flat. Knowing that I would be painting a stone wall, I decided to prime the flats with black paint instead of the usual white. This allowed me to save time later by not needing to shade in the grout lines.

After getting the flat primed, I experimented with a few rows to get my technique where I wanted it. The method I used was pinching masking tape onto the flat for the grout lines, then painting in the stones.

Here is a short video demonstrating the technique for pinching the tape. I found the spackle unnecessary.


Sunday, December 19, 2021

The Best No Sew Bow Tie

 My oldest son has an affinity for bow ties, so we decided to make him a bow tie in his favorite color. We looked through dozens of patterns online and stumbled across this amazingly simple pattern that you can make in less than an hour once you have everything gathered.

I can't take credit for this one, but I will definitely pass this along to anyone who needs a quick and simple bow tie!